We’ve all been there. You’re out in the wild, working on a project at home, or just trying to open a package, and your trusty pocket knife feels frustratingly dull. A sharp blade is a safe and effective blade, but what if your sharpener is nowhere to be found? Don’t panic. Knowing how to sharpen a pocket knife without a sharpener is a surprisingly useful survival skill, and you probably have the tools you need right in your home or backpack.
This guide will walk you through the simple science behind sharpening and show you how to use common items to bring that razor-sharp edge back to your knife. Get ready to turn everyday objects into your own personal sharpening kit.
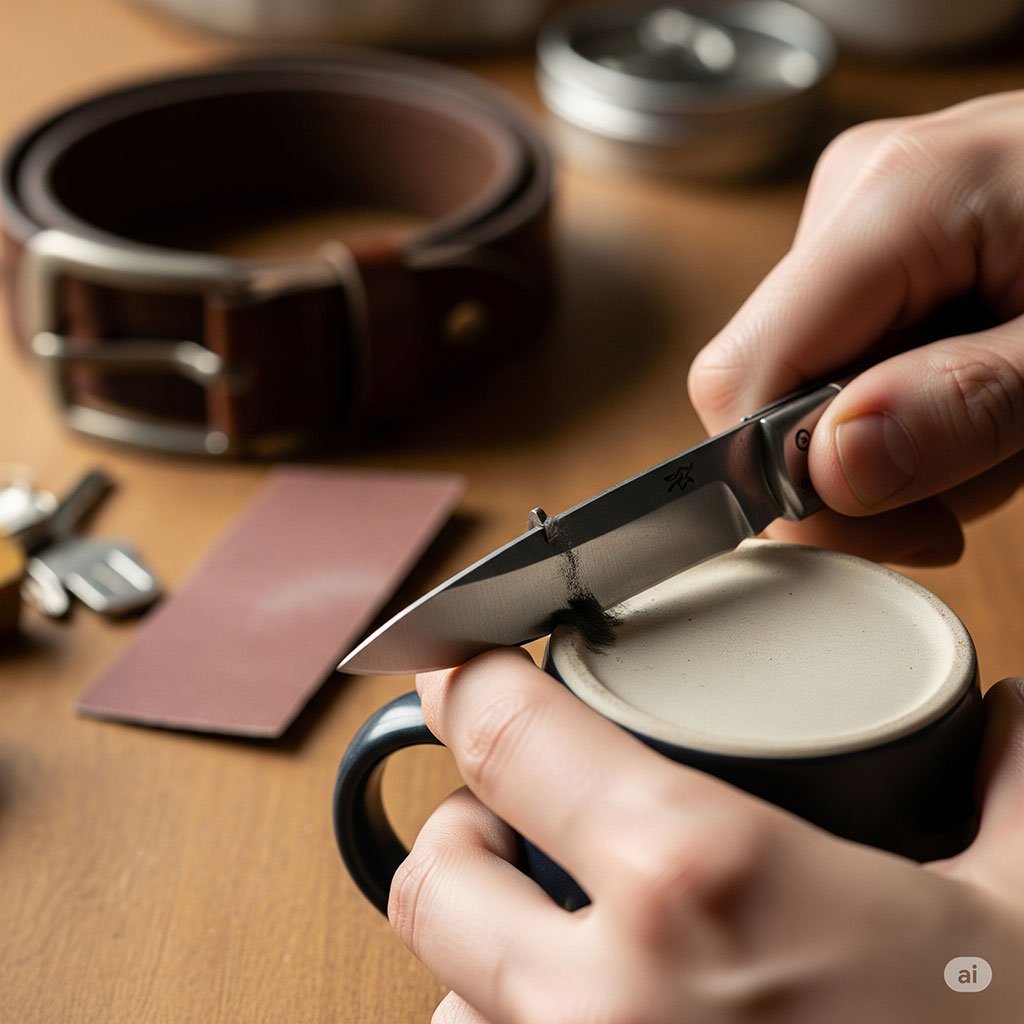
Table of Contents
A-B-Cs of Pocket Knife Sharpening
Before we jump into the “how,” let’s quickly chat about the “why.” A knife’s edge isn’t a smooth, perfect line. Under a microscope, it’s actually a super tiny, jagged saw. With everyday use, these tiny teeth get bent, rolled over, or even break off, making your blade feel dull.
Sharpening isn’t just about making the knife pointy again. It’s a process of realigning and grinding the steel to create a new, clean edge. We do this by using a surface that’s a bit harder than the knife’s steel to abrade away the metal.
The three most important things to remember are:
- Angle: The angle you hold the blade is everything. For most pocket knives, you’ll want to aim for a consistent 15-20 degree angle.
- Pressure: Start with a little more pressure to remove the dull metal, then ease up to refine the edge.
- Consistency: The secret to a professional-looking, sharp edge is keeping that angle and pressure steady throughout the entire process.
Method 1: Use Ceramic Mug or Plate to Sharpen a Pocket Knife Insteasd of a Sharpener
This is probably one of the most common and accessible DIY sharpening tricks out there. The unglazed ceramic ring on the bottom of a coffee mug or plate has a slightly abrasive quality that works a lot like a fine-grit sharpening stone.
What You’ll Need:
- A ceramic coffee mug or plate.
- A sturdy, flat surface.
- A few drops of water (highly recommended).
Step-by-Step Guide:
- Flip your mug: Turn the mug upside down to expose that rough, unglazed ceramic ring on the bottom. That’s your “stone.”
- Add a little water: Put a few drops of water on the ceramic. This helps reduce friction and keeps the surface from getting clogged with tiny metal particles.
- Find your angle: Hold the blade at a consistent 15-20 degree angle. An easy way to approximate this is to start with the blade straight up and down (90 degrees), then cut that in half (45 degrees), and then cut it in half again to get a good estimate of 22.5 degrees.
- Sharpen one side: With light to moderate pressure, pull the blade from the hilt to the tip across the ceramic. Listen for a light grinding sound. Repeat this about 10-15 times.
- Sharpen the other side: Flip the blade over and do the exact same thing on the other side.
- Finish it off: After you’ve worked both sides, alternate your strokes, doing one pass on each side. This helps get rid of any burr (a tiny curl of metal) and gives you a much finer edge.
Method 2: Use Concrete or Stone Slab to Sharpen a Pocket Knife Insteasd of a Sharpener
If you’re out in the wilderness or just don’t have a ceramic mug handy, a smooth, flat rock or a piece of concrete can save the day. It’s a coarser option, so it can remove a lot of material fast. Just be careful not to damage your blade.
What You’ll Need:
- A flat piece of concrete, a paver stone, or a smooth river rock.
- Water.
Step-by-Step Guide:
- Find a good surface: Look for the smoothest, flattest part you can find. The rougher the surface, the more aggressive the “grit” will be.
- Get it wet: Pour some water over the stone to lubricate the surface and help with the sharpening process.
- Establish your angle: Hold the knife at that same 15-20 degree angle against the stone.
- Sharpen with care: Use a circular or back-and-forth motion, applying light to moderate pressure. Work on one side of the blade, from the base to the tip, and then switch to the other side.
- Finish up: This method is pretty aggressive, so you’ll definitely want to “strop” the knife afterward to refine the edge and get rid of any big burrs.
Method 3: Use Leather Belt or Jeans Strop to Sharpen a Pocket Knife Insteasd of a Sharpener
This one isn’t for a completely dull knife, but it’s a game-changer for polishing and refining an already sharpened edge. This process, called stropping, is what gives a knife that truly razor-sharp, mirror-like finish. A leather belt makes an amazing improvised strop.
What You’ll Need:
- A leather belt (the smooth, backside is usually best).
- A pair of jeans.
- Sharpening compound (optional).
Step-by-Step Guide:
- Secure your strop: Hold your belt taut against a hard surface, or just use your jeans by holding one leg firmly.
- Position the blade: Place the blade flat against the leather or denim, with the cutting edge pointing away from the direction you’re going to move it. This is crucial!
- Strop the edge: With a super light touch, pull the blade away from the edge, from hilt to tip. The goal here is to smooth out those tiny, microscopic burrs, not to grind new metal.
- Flip and repeat: Flip the knife over and repeat the motion on the other side. A few dozen passes on each side will make a huge difference in the sharpness and finish of your blade.
Method 4: Use Sandpaper on a Flat Surface to Sharpen a Pocket Knife Insteasd of a Sharpener
Sandpaper is a very effective and controlled way to sharpen your knife. You can use different grits to perfectly replicate the process of a proper sharpening stone.
What You’ll Need:
- A few sheets of sandpaper (something like 200, 400, 800, and 1000 grit is a great range).
- A flat, stable surface (a block of wood or a countertop works great).
- Tape.
Step-by-Step Guide:
- Prep your surface: Tape your coarsest sandpaper (like 200 grit) to a flat surface. Make sure it’s completely flat and wrinkle-free.
- Start coarse: Hold your knife at a 15-20 degree angle and begin pulling the blade across the sandpaper, from the hilt to the tip. Use moderate pressure. Do this for several strokes on one side, then switch to the other.
- Move to finer grits: Once you feel like you have a decent edge, switch to the next finest grit (like 400). Repeat the process, but use lighter pressure this time.
- Refine the finish: Keep moving to finer and finer grits. That 1000 grit sandpaper will give you a beautiful, polished, and very sharp edge.
Quick Guide for DIY Sharpening a Pocket Knife
Method | Best For | Pros | Cons |
Ceramic Mug | Quick touch-ups, light sharpening | It’s everywhere! Great for refining an edge. | Small surface area can be tricky. Not for super dull knives. |
Concrete/Stone | Restoring a very dull blade | You can find it anywhere, very aggressive. | Very coarse, can damage the blade if you’re not careful. |
Leather Strop | Finishing and polishing an edge | Achieves a truly razor-sharp finish. | Only for polishing. Doesn’t sharpen a dull blade. |
Sandpaper | Full sharpening, restoring a dull blade | You can choose the exact grit you need, very effective. | Requires multiple grits and a flat surface to work well. |
Important Safety and Technique Tips for Sharpening Pocket Knives
- Always cut away from yourself. This is the number one rule of knife safety, and it’s especially important while you’re sharpening.
- Keep a consistent angle. I can’t stress this enough. Practice on an old, cheap knife first if you’re new to this.
- Use light pressure for the finishing touches. Too much pressure on fine grits or on your strop can actually damage that delicate edge you just created.
- Clean your blade. Once you’re done, wipe the blade down with a cloth to get rid of any tiny metal filings.
- Check for a burr. A burr is a tiny lip of metal that forms on the opposite side of the edge you’re sharpening. Feeling for it (carefully!) tells you that you’re removing metal correctly. Once you feel it, switch to the other side.
- Test the sharpness. The best test is a simple paper test. Hold a piece of paper by its edge and try to slice through it. A truly sharp knife will slice cleanly without catching or tearing.
FAQ
It’s very safe, as long as you’re careful. The main risk is slipping and cutting yourself, which you can avoid by always using a firm grip and moving the blade away from your body.
Yes, you can! The top edge of a rolled-down car window acts like a ceramic sharpening rod. It’s best for quick touch-ups or honing an edge that’s already mostly sharp.
For most general-purpose pocket knives, a 15-20 degree angle on each side is perfect. A steeper angle (25 degrees) will be more durable but a little less sharp, while a shallower angle (10-15 degrees) will be incredibly sharp but more fragile.
The paper test is the best way. Hold a piece of paper and try to slice it. A sharp knife will slice through it cleanly without any snags or tears.
This really depends on how much you use it. For most people, a light honing every few uses and a full sharpening every few months is usually all you need.
Sure, an emery board or a metal nail file can work in a pinch, similar to sandpaper or a coarse stone. Just use it with caution and be sure to finish with a finer abrasive.
The techniques are very similar, but pocket knives often have a slightly steeper sharpening angle (15-20 degrees) than most kitchen knives (15-17 degrees) because they need to be more durable for a wider variety of tasks.
Final Words
Having a dedicated sharpener is great, but knowing how to sharpen a pocket knife without a sharpener is a skill that can be incredibly useful. By using everyday items like a ceramic mug, a flat rock, or a leather belt, you can easily maintain your knife’s edge and ensure it’s always ready for whatever comes your way. Remember to always focus on safety and a consistent technique. With a little practice, you’ll be able to keep your blade sharp and effective, no matter where your adventures take you.