Is your favorite steak knife no longer cutting cleanly through that juicy ribeye? Are you struggling to saw through your food instead of slicing it effortlessly? It’s a common problem, and you might be wondering about the best way to sharpen serrated steak knives. Don’t worry, you’re not alone. Many people believe that serrated knives can’t be sharpened, but that’s a myth.
With the right tools and technique, you can restore your knives to their former glory, making mealtime a pleasure again. This comprehensive guide will walk you through everything you need to know, from understanding your knife to choosing the right sharpener and performing the process with confidence.

Table of Contents
Why Serrated Knives Are Different
Before you begin sharpening, it’s important to understand what makes a serrated knife different from a straight-edged one. A serrated blade has a series of individual pointed teeth separated by hollows, or gullets. This design allows the knife to “grip” and tear through tough exteriors, like a crusty loaf of bread or the seared outside of a steak, while the sharp points slice the inside.
Sharpening a serrated knife is not the same as sharpening a straight-edged blade. You can’t just run it over a flat sharpening stone. Doing so would only damage the teeth and make the knife useless. Instead, you need to sharpen each individual scallop or gullet. This is a more meticulous process, but it’s completely achievable with the right tools.
Why Sharpening Serrated Knives Matters
You might think that your serrated knife’s teeth will stay sharp forever, but they won’t. Over time, the points can become dull, bent, or even break off. A dull serrated knife is not just frustrating; it can also be dangerous. It requires more force to cut, increasing the risk of the knife slipping and causing injury.
Sharpening your serrated knives:
- Restores cutting power: Makes slicing effortless again.
- Improves safety: Reduces the chance of the knife slipping.
- Extends knife life: A well-maintained knife lasts for years.
- Saves money: Avoids the need to constantly buy new knives.
Choose the Right Tools for the Serrated Knives
Sharpening a serrated knife requires a specialized tool. You need a sharpener that can fit into the individual gullets of the blade. The most common and effective tools for this are:
1. Sharpening Rods (Honing Rods or Sharpening Steels)
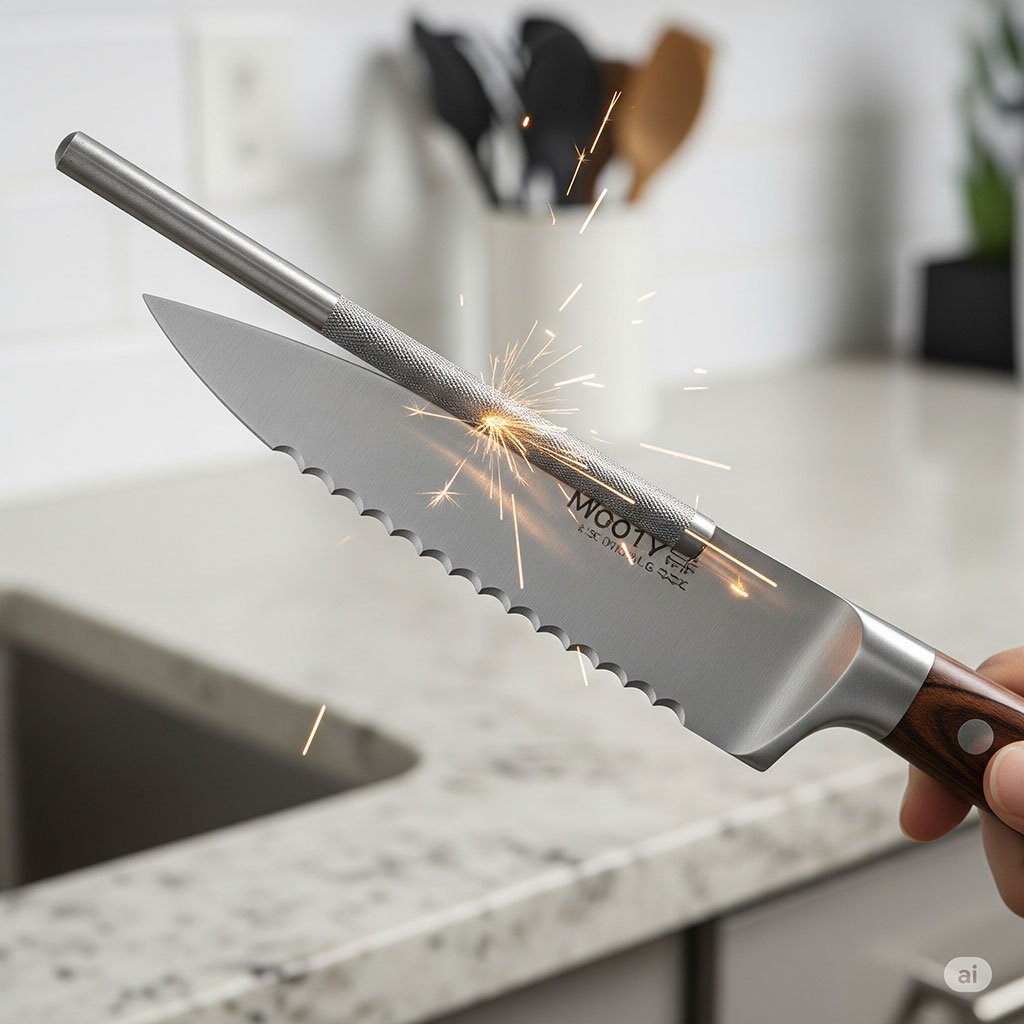
A sharpening rod, often made of ceramic or diamond-coated steel, is the go-to tool for many. They are long, thin, and come in various diameters. The key is to find a rod with a diameter that matches the size of the gullets on your knife. This allows the rod to get into each scallop and sharpen it properly.
- Diamond-coated rods: These are very abrasive and can quickly remove material. They are great for severely dull knives.
- Ceramic rods: These are less aggressive than diamond rods and are excellent for regular maintenance and polishing the edge.
2. Electric Knife Sharpeners with Serrated Slots
Some electric knife sharpeners have a specific slot designed for serrated knives. These can be a quick and convenient option, but they can also be aggressive. If you choose this route, make sure the sharpener is high-quality and specifically designed for serrated blades to avoid damaging your knives.
3. Tapered Diamond Rods
These rods are tapered, meaning they get thinner at the tip. This is a fantastic feature because it allows you to sharpen serrations of different sizes with a single tool. It’s versatile and a great choice if you have multiple serrated knives with varying gullet sizes.
Here is a simple table to help you decide which tool is right for you:
Sharpener Type | Best For | Pros | Cons |
Sharpening Rod | General sharpening and maintenance. | Affordable, effective, great control. | Can be time-consuming, requires technique. |
Electric Sharpener | Quick sharpening. | Fast, easy to use. | Can be aggressive, may remove too much material. |
Tapered Diamond Rod | Sharpening various serration sizes. | Versatile, very effective. | Can be a bit more expensive than a basic rod. |
How to Sharpen Serrated Steak Knives: Step-by-Step
Now that you have your tool, let’s get to the sharpening. This process focuses on using a sharpening rod, which is the most recommended method for home use.
Step 1: Examine Your Knife
First, take a close look at your serrated knife. You’ll notice that the blade is beveled on one side and flat on the other. You only need to sharpen the beveled side. The flat side is not sharpened and should not be touched with the sharpening rod.
Step 2: Find the Right Rod Size
Hold your sharpening rod up to the knife. Find a section of the rod that fits snugly into one of the serration gullets. It should be wide enough to make contact with the entire bevel, but not so wide that it can’t fit into the groove.
Step 3: Set Your Angle
Place the knife on a stable surface, with the beveled side facing up. Hold the knife firmly with your non-dominant hand. With your dominant hand, hold the sharpening rod and insert it into the first gullet at the base of the blade. The goal is to match the angle of the bevel. The angle is usually around 15-20 degrees. You can find this angle by laying the rod flat on the bevel and lifting it slightly until it feels right.
Step 4: Sharpen Each Gullet
Gently push the sharpening rod away from the handle and toward the tip of the knife, following the curve of the gullet. Apply light pressure. Repeat this motion three to five times for each gullet. The goal is to remove a tiny amount of metal and create a new edge. Don’t apply too much force; let the tool do the work.
Step 5: Check for a Burr
After sharpening each gullet on the beveled side, you may notice a slight “burr” on the flat side of the knife. A burr is a tiny, raised edge of metal. This is a good sign—it means you have successfully created a new edge.
Step 6: Remove the Burr (Optional but Recommended)
To remove the burr, gently and carefully run the flat side of the knife over a smooth, flat surface. A sharpening stone or even a ceramic mug can work. Just make one or two light passes to knock off the burr. You can also use a fine-grit honing rod. This final step creates a clean, sharp edge.
Step 7: Clean Your Knife
Always clean your knife after sharpening. Wash it with warm, soapy water to remove any metal filings, then dry it thoroughly to prevent rust.
Maintenance and Best Practices for Serrated Knives
Sharpening your knives is only half the battle. Proper maintenance is key to keeping them sharp for longer.
- Store Properly: Don’t just toss your knives into a drawer. They can bang against other utensils, damaging the edges. Use a knife block, a magnetic strip, or a blade guard.
- Use a Proper Cutting Board: Always use a cutting board made of wood, bamboo, or plastic. Glass or stone cutting boards will dull your knives very quickly.
- Wash by Hand: Never put your serrated knives in the dishwasher. The harsh detergents and high heat can dull the blade and damage the handle.
- Regular Honing: Honing is different from sharpening. It realigns a bent edge without removing metal. You can use a ceramic honing rod to regularly hone your knife’s edge, keeping it sharp between full sharpening sessions.
Advanced Tips for Sharpening
- Start with a practice knife: If you’re new to this, don’t start with your best steak knife. Use an older, less valuable knife to get the hang of the technique.
- Use a magnifying glass: A magnifying glass can help you see the individual serrations and the burr more clearly, ensuring you are sharpening correctly.
- Don’t over-sharpen: Sharpening removes metal. If you do it too often or too aggressively, you’ll wear out the knife faster. Sharpen only when the knife is noticeably dull.
FAQ
No, you should never use a traditional V-shaped sharpener or a flat sharpening stone on a serrated knife. It will ruin the serrations and make the knife unusable. Always use a tool designed for serrated edges, like a sharpening rod.
This depends on how often you use them. For a knife used regularly, sharpening once or twice a year is a good rule of thumb. However, regular honing can help maintain the edge for longer.
Sharpening removes a small amount of metal to create a new, sharp edge. Honing realigns the existing edge that has been bent or rolled over with use. Honing is a much gentler, more frequent process.
The general principle is the same, but the size and shape of the serrations can vary. You might need a different size sharpening rod for a bread knife than you would for a steak knife.
A dull serrated knife will require you to saw back and forth to cut food. A sharp one will grip and slice with much less effort. If you find yourself struggling to cut through a steak, it’s time to sharpen.
Professional sharpening is an option, especially if you have high-end knives. However, with the right tools and a little practice, you can easily and safely sharpen your own knives at home, saving you money and time.
Yes, a small, round file can be used similarly to a sharpening rod. Just be careful not to remove too much metal. A diamond-coated rod or a ceramic rod is generally a better choice for most home cooks.
Conclusion
Sharpening your serrated steak knives at home is not a mystery—it’s a skill you can master. By understanding the unique design of your knife and using the right tools, you can easily restore its cutting power. The best way to sharpen serrated steak knives involves using a round sharpening rod to carefully sharpen each gullet on the beveled side of the blade. With a little practice, your knives will be slicing through steaks with ease, making every meal a better experience.


