Is your trusty pocket knife feeling a little dull? A sharp blade is crucial for safety and efficiency, but you don’t need a professional setup to achieve it. You can easily bring your blade back to life with a simple handheld sharpener. This guide will walk you through how to sharpen a pocket knife with a handheld sharpener so you can get back to what you love with a reliable, razor-sharp tool.
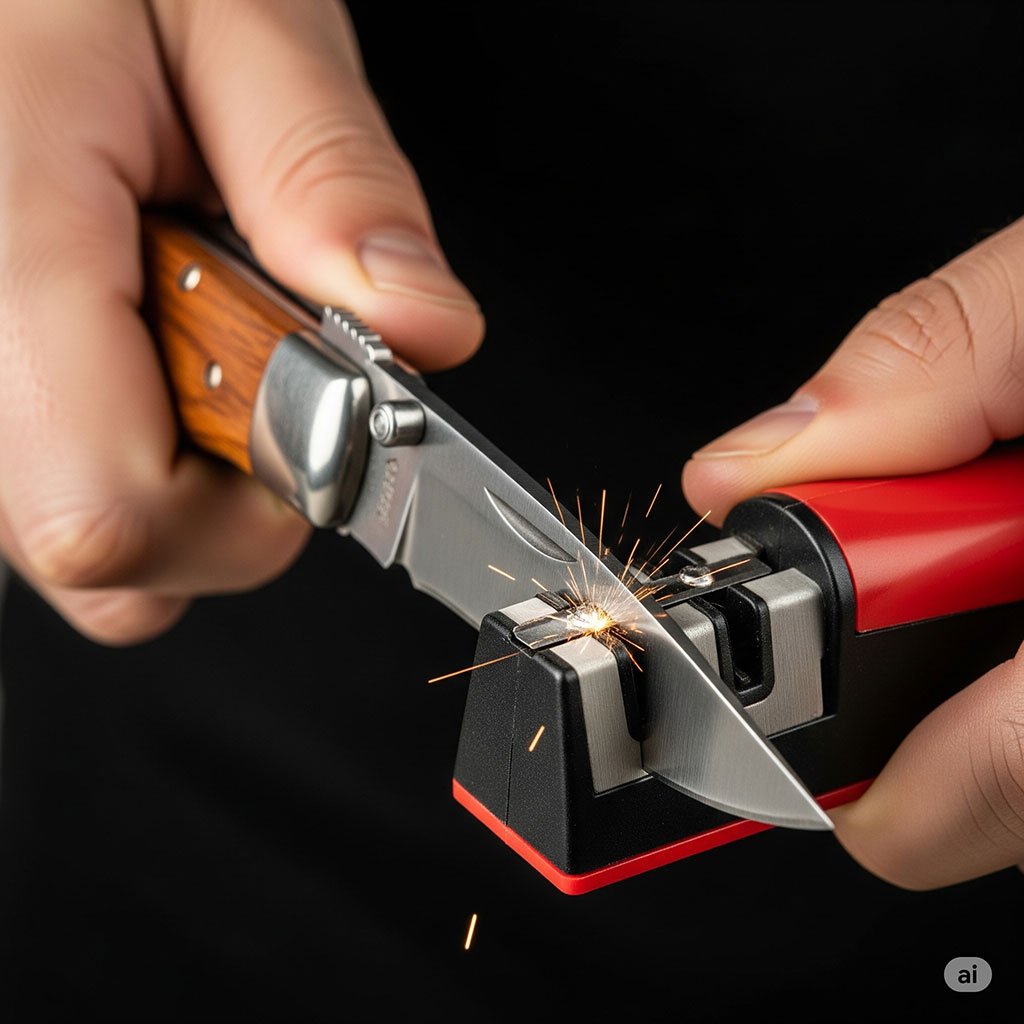
Table of Contents
Why You Need to Sharpen Your Pocket Knife?
A sharp knife is a safe knife. A dull blade requires more force to cut, increasing the risk of slipping and causing injury. A sharp blade, on the other hand, slices through materials with minimal effort, giving you more control. Regular sharpening also extends the life of your knife, preventing the blade from becoming chipped or damaged. Whether you use your pocket knife for camping, fishing, or everyday tasks, maintaining a keen edge is essential.
Handheld Sharpener-Explained
Before you start, it’s important to know the parts of your sharpener. Most handheld sharpeners have a few key components:
- Coarse Grit: This is for shaping the edge and removing nicks. It’s used when your knife is very dull or has minor damage.
- Fine Grit: This is for honing and polishing the blade. It creates that razor-sharp finish.
- Ceramic or Diamond Rods: These rods often form a V-shape and are great for quick touch-ups.
- Carbide Blades: These are often found in the coarse section and are very aggressive. Use them with caution.
A Pre-Sharpening Checklist
Before you begin sharpening, a little preparation goes a long way.
- Clean Your Blade: Use a cloth or a paper towel to wipe down the blade. Remove any dirt, debris, or moisture. A clean blade ensures a better sharpening result.
- Understand Your Knife’s Bevel: The bevel is the angle of the blade’s edge. Most pocket knives have an edge angle between 20 and 25 degrees. Many handheld sharpeners are pre-set to these angles, making the job much easier.
- Find a Stable Surface: A steady hand is important. Work on a flat, stable surface like a workbench or a sturdy table. This helps you maintain control and consistency.
Step-by-Step: How To Sharpen A Pocket Knife With A Handheld Sharpener
Now, let’s get into the main event. Follow these steps to sharpen your pocket knife effectively.
Step 1: Start with the Coarse Grit
If your knife is very dull or has some minor chips, you’ll need to start with the coarse grit. This is the part of the sharpener that does the heavy lifting.
- Hold the Sharpener: Grip the sharpener firmly in one hand. Make sure your fingers are away from the sharpening area.
- Position the Knife: Place the heel of the blade (the part closest to the handle) in the coarse sharpening slot.
- Pull the Blade Through: With moderate, consistent pressure, pull the knife through the slot. Imagine you’re trying to slice a thin layer off the sharpening surface.
- Repeat: Repeat this motion about 5 to 10 times. You will hear a scratching sound. This is normal. It means the sharpener is doing its job.
- Flip the Blade: Turn the knife over and repeat the process on the other side. You need to sharpen both sides of the blade evenly to get a symmetrical edge.
Step 2: Move to the Fine Grit
Once you’ve shaped the blade with the coarse grit, it’s time to refine the edge with the fine grit.
- Switch to the Fine Slot: Move your knife to the fine sharpening slot on your handheld sharpener. This part is less aggressive and will create a smoother, sharper edge.
- Use Lighter Pressure: The goal here is to polish the edge, not to remove a lot of metal. Use much lighter pressure than you did with the coarse grit.
- Pull and Repeat: Pull the blade through the fine slot 5 to 10 times, alternating sides. You should feel a much smoother pull and hear a less aggressive sound.
Step 3: Finish with Honing
Some handheld sharpeners have ceramic or diamond rods for final honing. This step is optional but highly recommended for a truly razor-sharp edge.
- Use the Rods: Hold the knife at the correct angle (usually between 20-25 degrees) against the rods.
- Swipe the Blade: Gently swipe the blade along the rod, from heel to tip. Alternate sides with each swipe.
- Repeat: Do this 5-10 times per side. This removes any small burrs (tiny pieces of metal) left on the edge and polishes it to a mirror finish.
A Quick Reference Chart for Sharpening Pocket Knife
This chart summarizes the sharpening process and the role of each component.
Sharpener Part | Purpose | Pressure Level | Number of Pulls (per side) | When to Use |
Coarse Grit | Reshaping a dull edge, fixing minor chips | Medium-Heavy | 5-10 | When the knife is very dull or has been damaged |
Fine Grit | Honing and polishing the edge | Light | 5-10 | After using the coarse grit or for light touch-ups |
Ceramic/Rods | Final honing, removing burrs, and polishing | Very Light | 5-10 | For a razor-sharp finish |
Advanced Tips for Better Sharpening
To get the best possible result, keep these tips in mind.
- Maintain a Consistent Angle: The key to a good edge is consistency. While handheld sharpeners help with this, try to pull the knife through at the same speed and angle each time.
- Check for a Bur: A bur is a tiny, curled-up piece of metal on the edge of the blade. You can feel it by gently running your thumbnail across the edge (away from the sharp side!). When you feel a bur on one side, it means you’ve sharpened enough on the other.
- Wipe Down the Blade: After sharpening, wipe the blade with a clean cloth to remove any metal filings. This keeps your knife and your food clean.
- Practice Makes Perfect: Don’t be discouraged if your first attempt isn’t perfect. Sharpening is a skill that improves with practice. Start with a less-used knife to get the hang of it.
Common Mistakes to Avoid When You Sharpen Your Pocket Knife
- Too Much Pressure: Using too much force, especially with coarse grit, can remove too much metal and damage your blade. Let the sharpener do the work.
- Inconsistent Angle: If you don’t keep the angle consistent, you’ll end up with a rounded edge instead of a sharp one.
- Sharpening Dry: Some sharpeners can be used with a little bit of water or oil. Check your sharpener’s instructions. A lubricant can help reduce friction and keep the metal filings from clogging the sharpener.
- Skipping the Fine Grit: The coarse grit creates a rough edge. The fine grit is what truly hones and sharpens the blade. Don’t skip this crucial step!
How to Maintain Your Handheld Sharpener
Just like your knife, your sharpener needs a little love to perform its best.
- Clean It Regularly: Metal filings can build up on the sharpening surfaces. Use a small brush or an old toothbrush to clean them out.
- Store It Properly: Keep your sharpener in a dry place to prevent rust.
- Replace When Worn: Over time, the sharpening surfaces will wear down. If you notice your sharpener isn’t working as well, it might be time for a new one.
Can a Handheld Sharpener Ruin Your Knife?
This is a common concern. The truth is, it’s highly unlikely that a quality handheld sharpener will ruin your knife if you use it correctly. The key is to use the right amount of pressure and follow the steps. Aggressive, improper use, especially with carbide sharpeners, can wear down the blade faster. But with a bit of care and practice, a handheld sharpener is a safe and effective tool.
FAQ
It depends on how often you use it. For frequent users, a quick touch-up with the fine grit or ceramic rods once a week is a good idea. A full sharpening with the coarse grit might only be needed a few times a year.
Most handheld sharpeners are designed for straight edges. Sharpening a serrated blade requires a specialized tool, often a ceramic rod with a triangular or conical shape, to get into each scallop.
Sharpening removes metal from the blade to create a new, sharp edge. Honing, on the other hand, realigns the microscopic edge of the blade, which can get bent over time. Honing does not remove much metal at all.
Most pocket knives are sharpened at an angle between 20 and 25 degrees. Many handheld sharpeners have pre-set angles that fall within this range, taking the guesswork out of it for you.
A simple and safe test is the paper test. Hold a piece of paper by the edge and try to slice through it with your knife. A truly sharp knife will slice through the paper cleanly and without snagging.
Yes, you can. Many handheld sharpeners are versatile enough to work on a variety of blades, including kitchen knives. Just make sure the blade fits properly in the sharpening slots.
Neither is inherently “better.” A whetstone offers more control over the sharpening angle but has a steeper learning curve. A handheld sharpener is faster and easier for beginners, with pre-set angles that ensure a consistent edge. The best tool is the one you feel most comfortable and confident using.
Conclusion
Mastering how to sharpen a pocket knife with a handheld sharpener is a skill every knife owner should have. It’s a simple, fast, and effective way to keep your blade in top condition. By following these steps, you can maintain a sharp, safe, and reliable pocket knife without any hassle. A well-maintained blade is a joy to use and a reflection of your commitment to your tools.