A sharp knife is a safe knife. Whether you’re a camper, a fisherman, or simply someone who appreciates a useful tool, knowing how to sharpen a pocket knife with a whetstone is a skill that will serve you for a lifetime. A dull knife requires more force, increasing the chance of an accident. A sharp blade, however, glides through tasks effortlessly and safely. This guide will walk you through the process, from selecting the right tools to perfecting your technique.
Table of Contents
Why Choose a Whetstone?
While there are many modern sharpening tools available, a whetstone remains a classic for a reason. It offers precision and control, allowing you to create a perfectly customized edge. A good whetstone is also versatile, capable of handling a variety of blades beyond just pocket knives. It’s a rewarding, hands-on process that connects you with the craft of blade maintenance.
Essential Tools for Sharpening
Before you begin, gather your gear. You don’t need a lot of fancy equipment, but the right tools make a big difference.
- Whetstone: This is the most crucial item. Whetstones come in various types and grits. Grit refers to the coarseness of the stone. A lower number means a coarser grit, which is used for major reshaping and repairs. A higher number means a finer grit, perfect for polishing and creating a razor-sharp edge.
- Water or Honing Oil: Some whetstones, like natural Japanese water stones, require water. Others, like Arkansas stones, use honing oil. The liquid helps flush away the metal particles created during sharpening and prevents the stone from clogging.
- A Rag or Paper Towel: You’ll need this to wipe down your blade and stone.
- A stable surface: A non-slip mat or a wet paper towel under your whetstone will prevent it from moving around.
- Safety Gloves (Optional): If you’re new to sharpening, gloves can provide an extra layer of protection.
How to Chose the Right Whetstone Grits
Choosing the right whetstone is key. Many whetstones are double-sided, with a coarse grit on one side and a fine grit on the other. This makes them a great all-in-one solution. Here’s a simple guide to grit types:
Grit Range | Purpose | Common Uses |
Coarse (120-400 grit) | Removes a lot of material quickly. Used for repairing chips or major re-profiling of a dull edge. | Reshaping a very dull or damaged blade. |
Medium (800-1500 grit) | The workhorse grit. Used for sharpening a moderately dull knife and preparing it for a finer polish. | General sharpening of a regularly used knife. |
Fine (3000-8000+ grit) | Polishes the edge to a mirror finish. This creates an extremely sharp, smooth cutting edge. | Final honing and daily maintenance. |
For most pocket knives, a combination stone with a 1000/3000 grit is a great starting point.
Step-by-Step: How to Sharpen a Pocket Knife With a Whetstone
Now, let’s get into the nitty-gritty. Sharpening a knife is all about consistency and patience. Take your time, and focus on maintaining the correct angle.
Step 1: Prepare Your Whetstone
- If you have a water stone, submerge it in water for about 10-15 minutes until it stops bubbling. This indicates it’s fully saturated.
- If you’re using an oil stone, apply a few drops of honing oil to the surface.
- Place the whetstone on your stable surface. A non-slip mat or a damp cloth underneath will keep it from sliding.
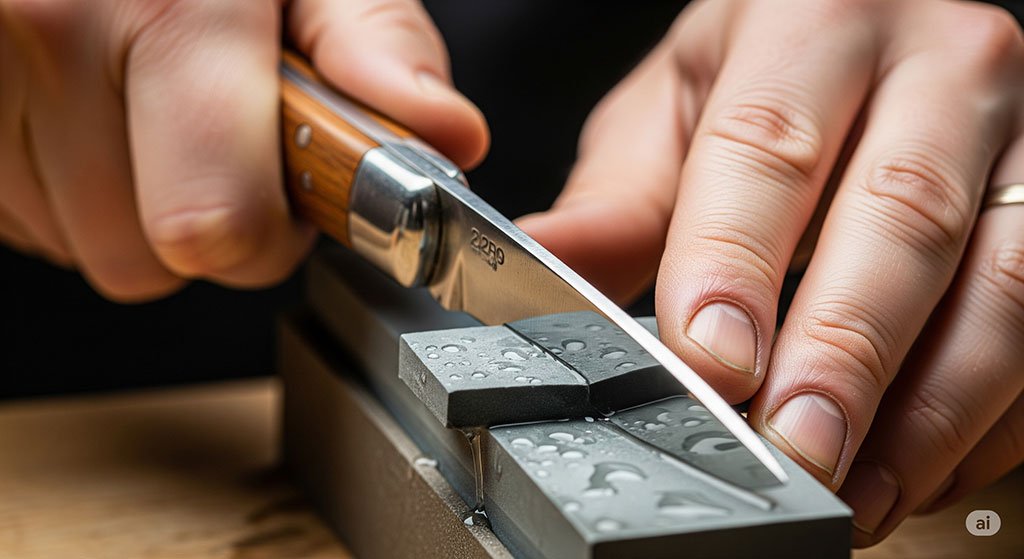
Step 2: Find the Right Angle
This is the most critical part. The angle at which you hold the blade determines the final edge geometry.
- Pocket knives typically have an edge angle between 15 and 25 degrees per side. A smaller angle (15-17 degrees) is great for precision slicing, like on a kitchen knife. A larger angle (20-25 degrees) creates a more durable edge, ideal for a rugged pocket knife that sees hard use.
- A great way to find the angle is to use the “marker trick.” Take a permanent marker and color the very edge of the blade. When you place the blade on the stone at the correct angle, the marker will be removed evenly from the entire bevel. If the marker is only removed from the top or bottom of the bevel, adjust your angle.
- Practice with a guide: If you’re a beginner, an angle guide can be a lifesaver. These are small plastic or metal clips that slide onto the spine of your blade, forcing you to maintain a consistent angle.
Step 3: Sharpen on the Coarse Grit
- Place the heel of the blade (the part closest to the handle) on the coarse side of the stone at your chosen angle.
- Using light to moderate pressure, push the knife away from you, as if you are trying to slice a thin layer off the stone. Use your non-dominant hand to apply pressure on the blade near the edge.
- Draw the blade across the stone in a continuous motion, ensuring the entire edge from heel to tip is making contact.
- Repeat this motion 5-10 times. You will see a dark slurry form on the stone—this is normal.
- Now, switch directions. With the blade facing you, draw it towards your body, again maintaining the correct angle. This is the “pulling” motion.
- Alternate between the two motions until you feel a burr forming on the opposite side of the blade. A burr is a tiny, microscopic curl of metal that forms when the two sides of the edge meet. You can feel it by carefully running your fingertip off the edge (never along it!) or with your fingernail.
Step 4: Sharpen the Other Side
- Once you’ve felt the burr along the entire length of one side, flip the knife over and repeat the entire process on the other side.
- Continue until you feel a burr on the first side again. This means you’ve successfully thinned the edge on both sides.
Step 5: Move to the Finer Grit
- Once you’ve established a burr on both sides with the coarse grit, switch to the fine side of your stone.
- Repeat the same motions, but use much lighter pressure. This step isn’t about removing material; it’s about refining the edge and removing the burr.
- Use a smaller number of strokes on each side, maybe 3-5 at a time, and alternate sides more frequently. This “micro-beveling” polishes the edge.
Step 6: Stropping (Optional but Recommended)
- Stropping is the final step to a truly razor-sharp edge. A leather strop with or without a polishing compound helps to remove the final burr and align the edge perfectly.
- Place the blade on the strop and pull it backwards (away from the cutting edge). This is the key difference from sharpening—you never push the edge into a strop.
- Alternate sides a few times until the edge feels incredibly smooth and sharp.
Common Sharpening Mistakes to Avoid
Sharpening a knife with a whetstone requires precision and practice. Avoiding common errors is just as important as mastering the technique itself.
- Inconsistent Angle: This is the most common mistake. A wobbly angle will result in a rounded, dull edge. Use a guide or practice until you can hold the angle steady.
- Too Much Pressure: While coarse stones require some pressure, too much can damage the edge or cause the blade to slip. On fine stones, use very little pressure.
- Forgetting to Use a Lubricant: A dry whetstone will get clogged with metal dust, making it ineffective. Always use water or oil as recommended by the manufacturer.
- Not Feeling for a Burr: The burr is your signpost. It tells you that you’ve thinned the edge enough on one side and are ready to move to the next step.
How to Test Your Knife’s Sharpness After Sharpening with a Whetstone
After all your hard work, you’ll want to test your blade. A few simple tests can tell you how well you did.
- The Paper Test: Hold a piece of printer paper by the top edge. A truly sharp knife will slice through the paper with ease, without tearing or catching.
- The Tomato Test: A sharp knife will slice through a ripe tomato’s skin effortlessly, without needing to press down hard.
FAQ
This depends on how often you use it. For a knife used daily, you might need to touch up the edge every few weeks. A simple paper test can tell you when it’s time to sharpen.
No, a standard whetstone is not suitable for serrated knives. Serrations require a specific conical or triangular sharpening rod to sharpen each individual serration.
Sharpening removes metal to create a new, sharp edge. Honing, or stropping, realigns an already sharp edge that has become misaligned through use. Think of honing as straightening the edge, not resharpening it.
Always follow the manufacturer’s recommendation. Using the wrong fluid can damage the stone. Water stones should only use water; oil stones require honing oil. Never mix them.
While you can’t “over-sharpen” in the sense of making it too sharp, you can remove too much material. This is why using the right grit and proper pressure is important. The goal is to remove just enough material to create a new edge, not to grind away the blade.
Yes, but be cautious. Electric sharpeners can remove a lot of material quickly and can sometimes overheat the blade, which can affect the steel’s temper. A whetstone gives you far more control and a more refined edge.
After each use, clean your whetstone with a brush and water to remove metal particles. Over time, a whetstone can develop a concave shape in the middle. You can flatten it using a flattening stone or coarse sandpaper on a flat surface.
Conclusion
Learning how to sharpen a pocket knife with a whetstone is a deeply satisfying skill that will make your favorite tools feel new again. With a little practice, you’ll be able to get a ridiculously sharp edge, making every task easier and safer. Just remember to grab the right tools, keep that angle steady, and be patient. The reward is a sharp, reliable blade you’ll be proud of for years to come.