To install a wall-mounted drying rack, first, locate the studs in the wall using a stud finder. Then, use a drill to secure the rack to the studs, making sure it is level.
When installing a wall-mounted drying rack, it’s important to follow the manufacturer’s instructions carefully to ensure proper installation. A well-installed drying rack can provide a convenient and space-saving solution for drying clothes and linens, making it a great addition to any laundry room or small living space.
By following the steps below, you can easily mount a drying rack on your wall, providing a practical and efficient drying solution for your home. With the right tools and a few simple steps, you can have your wall-mounted drying rack installed and ready to use in no time.
Table of contents
Choosing The Right Drying Rack
When choosing a wall-mounted drying rack, it’s important to consider the available space and ensure that the rack fits the designated area. Evaluate the weight capacity and durability, especially if you plan to hang heavy items on the rack.
Look for a rack made of sturdy materials such as stainless steel or aluminum to ensure longevity. Additionally, consider the design and functionality of the rack to ensure it meets your specific needs. Keep in mind the space available and ensure the rack is suitable for the intended area.
Preparing For Installation
When installing a wall-mounted drying rack, the first step is to gather all the necessary tools and materials. The essential tools required for this project include a power drill, screws, a screwdriver, a level, and a measuring tape.
It is important to ensure that the wall surface is suitable for installation and to locate the wall studs using a stud finder. In addition, the essential materials and hardware needed for the installation include the wall-mounted drying rack kit, anchors, and mounting brackets.
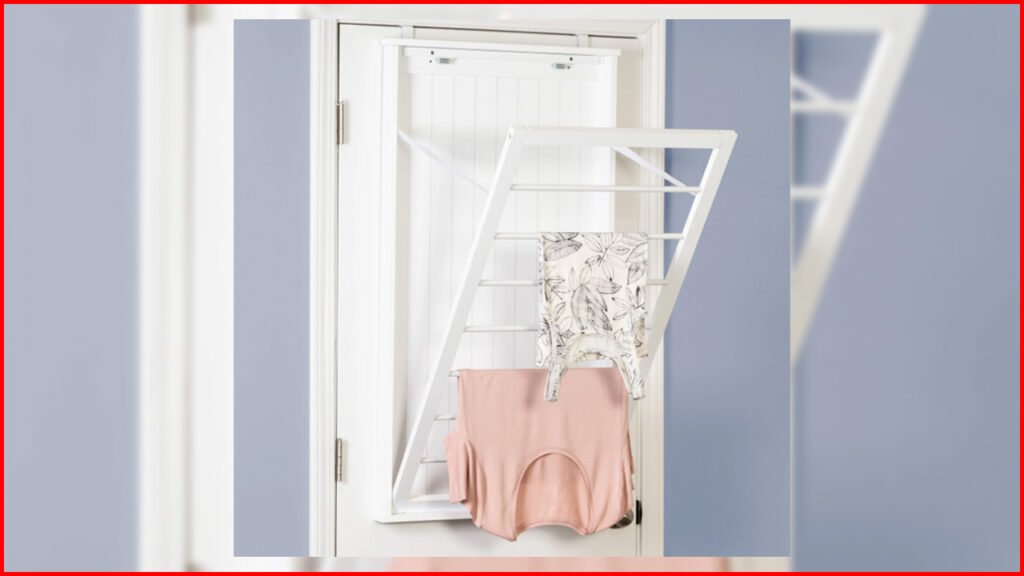
Instal Wall-mounted Drying Rack: Easy Steps
Locating the Ideal Position: Before installing the wall-mounted drying rack, determine the ideal position in the designated room. Consider factors such as convenience, available space, and proximity to laundry facilities.
Measuring and Marking the Mounting Points: Use a measuring tape and level to accurately measure and mark the mounting points on the wall. This step is crucial to ensure proper alignment and stability of the drying rack.
Attaching the Drying Rack to the Wall: Carefully position the rack against the marked mounting points and securely attach it to the wall using the appropriate hardware and tools as per the manufacturer’s instructions.
Step-by-Step Mounting Instructions: Follow the step-by-step mounting instructions provided with the wall-mounted drying rack to ensure a smooth and efficient installation process.
Securing the Drying Rack in Place: Once the rack is in position, ensure that it is securely fastened to the wall, providing a stable and reliable solution for drying clothes.
Final Adjustments and Testing: Conduct final adjustments to the rack’s position and stability before testing its weight-bearing capacity, ensuring it can withstand the intended load without compromising safety or functionality.
Credit: honeycando.com
FAQ
How Do You Install A Hanging Drying Rack?
To install a hanging drying rack, find a sturdy ceiling or wall location. Use a drill to install hooks or brackets. Hang the rack securely from the hooks or brackets, ensuring it is level and stable. Follow manufacturer’s instructions for weight limits.
Where Do You Put An Indoor Drying Rack?
Place an indoor drying rack in a well-ventilated area with enough space. Avoid blocking doorways or high-traffic areas. Ensure it’s near a power source for heated racks. Keep it away from direct sunlight to prevent fading. Consider the weight of wet laundry for stability.
Where Do You Put Clothes In An Airer?
You should hang clothes on the airer’s bars or place them on the drying racks. This allows air circulation and helps them dry faster.
How To Build A Wall Mounted Drying Rack?
To build a wall mounted drying rack, measure and mark the mounting location on the wall. Install brackets to anchor the rack securely. Attach the rack to the brackets and ensure it is level. Test the rack’s sturdiness before using it to dry clothes.
Conclusion
Installing a wall-mounted drying rack is a practical and space-saving solution for drying clothes. With the right tools and step-by-step guidance, anyone can tackle this DIY project. By following the tips outlined in this post, you can effortlessly add functionality to your laundry area.
Get ready to enjoy the convenience of a wall-mounted drying rack!