Let’s be honest-when was the last time you gave your razor a real, deep scrub? We’re all guilty of just blowing on the blades or giving it a quick tap on the sink, but that doesn’t really cut it.
If your morning routine is starting to feel like a tug-of-war with your facial hair, your device isn’t broken—it’s just clogged.
That’s why I’m going to show you exactly how to clean an electric shaver the right way. It is the single best thing you can do to stop skin irritation, keep your motor running fast, and make those expensive blades last for years.
Whether you have a rotary or a foil model, this guide covers the simple maintenance routine I use to keep my gear in top shape.
Table of Contents
Why You Must Clean Your Electric Shaver (It’s Not Just About Looks)
You might think, “It looks clean enough, why bother?” But there is a lot happening under that foil that you can’t see.
- Performance: Your shaver works by shearing hair between moving blades and a stationary guard. When skin flakes, hair clippings, and sebum (skin oil) clog those gaps, the motor has to work twice as hard. This slows down the blades, leading to painful pulling.
- Hygiene & Skin Health: A dirty shaver is basically a petri dish for bacteria. If you are struggling with razor burn or sudden breakouts, your unwashed razor is likely the culprit.
- Lifespan: Electric shavers aren’t cheap! Regular cleaning prevents the motor from burning out and keeps the blades sharp.
Tools and Materials You Will Need
Before we start, gather your supplies. You don’t need fancy equipment, just a few basics:
- The Cleaning Brush: Usually comes in the box with your shaver. (If you lost it, a clean, stiff toothbrush works too).
- Liquid Soap: Standard hand soap is fine, but avoid anything with heavy microbeads.
- Warm Water: For rinsing.
- Lubricating Oil: This is the secret ingredient. Clipper oil or sewing machine oil works best.
- Isopropyl Alcohol: For the deep-cleaning disinfection step.
Step-by-Step: How to Clean an Electric Shaver (The Daily Routine)
Ideally, you should do a “dry clean” after every single shave. It takes about 30 seconds and saves you a headache later.
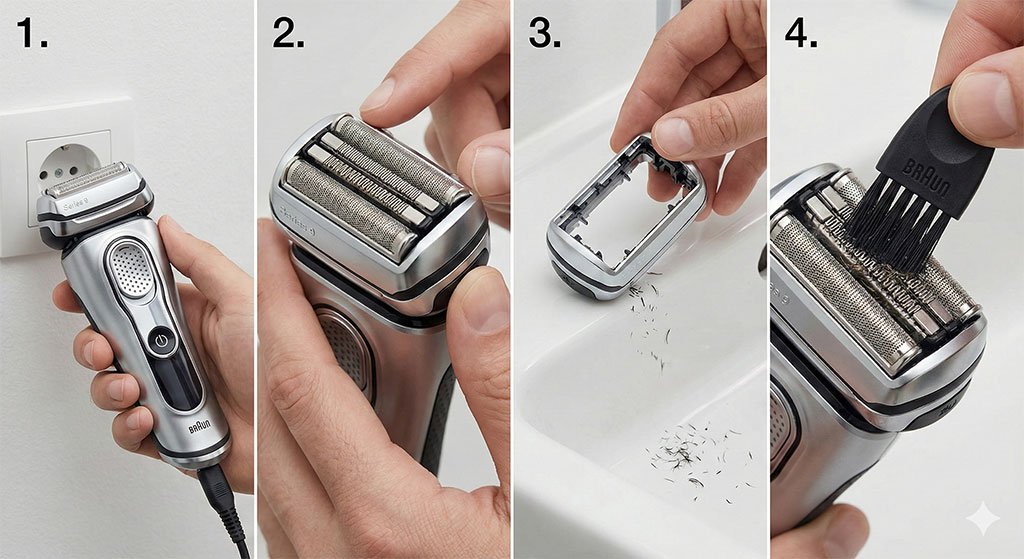
1. Turn It Off and Unplug
Safety first! Never try to disassemble or clean a shaver while it’s running or plugged into the wall.
2. Remove the Head Assembly
This depends on your model.
- For Rotary Shavers (like Philips Norelco): You usually press a button to flip the head open.
- For Foil Shavers (like Braun or Panasonic): There are usually release buttons on the side to pop the foil cassette off.
3. Empty the Hair Chamber
Gently tap the plastic frame of the shaver head against the side of your sink or a trash can. Important Warning: Do not tap the metal foil or the rotary blades directly on a hard surface. They are incredibly precise and fragile; one dent can ruin the shaver and scratch your face.
4. Brush the Blades
Take your small cleaning brush and sweep out the remaining hairs from the internal cutters.
- Pro Tip: If you have a foil shaver, do not brush the foil itself. The bristles can poke through the mesh and break it. Only brush the inner cutting block.
Deep Cleaning Guide: Wet vs. Dry Methods
Once a week (or at least once a month), you need to go deeper. The method you choose depends on whether your shaver is waterproof.
Method A: Wet Cleaning (For Waterproof/Wet-Dry Models)
This is my favorite method because it flushes out grease and oil that dry brushing misses.
- Apply Soap: Put a drop of liquid soap on the foils or rotary heads.
- Add Water: Sprinkle a little water on top.
- Run the Shaver: Turn the shaver on. The blades will whip the soap and water into a lather, forcing it through the cutting elements and pushing out deep-seated dirt.
- Rinse: With the shaver still running, hold the head under warm running water until all the suds are gone.
- Dry: Turn it off, shake off excess water, and leave the head open (or removed) to air dry completely.
Method B: Dry Cleaning (For Non-Waterproof Shavers)
If your shaver isn’t waterproof, water is the enemy.
- Disassemble: Take the head apart as much as the manufacturer allows.
- Spray Cleaner: Use a dedicated electric shaver cleaning spray (like Remington Shaver Saver). These sprays break down sebum and lubricate the blades without water.
- Compressed Air: A can of compressed air (like you use for keyboards) is great for blowing stubborn dust out of the motor housing.
Advanced Maintenance: Lubrication and Disinfecting
If you want your shaver to cut like it’s brand new, do not skip this part.
How to Oil Your Electric Shaver
Metal rubbing against metal creates friction and heat. Oil reduces that friction.
- Place a single drop of light machine oil on each foil or rotary head.
- Turn the shaver on for 10 seconds to let the oil distribute evenly.
- Gently wipe off any excess oil from the outside with a tissue so it doesn’t get on your face.
How to Disinfect
If you have sensitive skin, dip the cutter block (not the whole shaver!) into a small cup of isopropyl alcohol for 30 seconds. This kills 99.9% of bacteria. Rinse with water afterward to remove the alcohol smell.
FAQ
Only if it is marked as “Wet/Dry” or has a shower icon on the handle. If you are unsure, stick to dry cleaning to be safe.
You can use a toothbrush for brushing and standard liquid hand soap for degreasing. For lubrication, a tiny drop of mineral oil works if you don’t have clipper oil.
Dry clean (brush out hair) after every use. Wet clean or deep clean once a week.
Yes, it’s great for disinfecting the blades, but it strips away lubrication. If you use alcohol, you must apply oil immediately afterward.
Conclusion
Taking care of your grooming tools is just as important as the shave itself. Now that you know how to clean an electric shaver properly, you will notice a smoother glide and less irritation immediately.
Don’t wait until your battery dies or your blades dull—go grab your shaver and give it the spa day it deserves right now!
Author Note: If you found this guide helpful, share it with a friend who might be neglecting their razor!